WHAT'S NEW?
Loading...

3.1 Simple formatting

When I say simple formatting, I mean selection of a piece of text to be rendered in another font, colour,
alignment etc. When it gets more advanced, we will start working with Styles, which gives more options.

1. Select the first line using the mouse.
2. Select the Home Tab in the Ribbon.
The Home Tab contains all the basic functions for formatting text. I am not sure why it is called the Home Tab,
but it probably has to do with it being the one shown first.

3. Click on the Bold Button in the Ribbon. It is the button with a ”B” on it (see Figure 13). 
Figure 13: The Bold Button (the yellow button). 

The first line is now in bold.
4. Select once again the text you have just formatted
5. Click on the Center Button.  
Figure 14: The Center Button 
The first line on the page has now been centered. 

3. Writing and Simple Formatting

Let us write some text, so we have something to work with. You must type the following text into a blank document. When I write "Press ENTER on the keyboard", you obviously do not write it, but press ENTER (or RETURN key, as some call it).

This is the first exercise in Word 2007. Press the ENTER key on the keyboard. When I have finished reading the book and done all the exercises, I will be able to solve virtually any task in connection with letter writing, report writing, mail merging, printing, envelopes and labels. (Press the ENTER
key on the keyboard). 

I will also learn how to insert images and even spreadsheets and charts from Excel. (Press the ENTER key on the keyboard). 
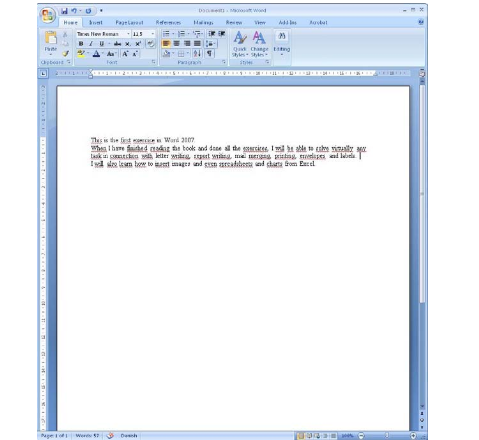
It should look like this: 
Figure 12: Our Text Inside Word.
 

I think you agree that this text looks a little boring. Luckily, there are a lot of things you can do to make it look more attractive, and that is precisely what the next exercises are about. Actually, this small piece of text can teach you a lot about Word’s formatting options, the simple as well as the more advanced ones. 

2.2 Starting a New Document from a Template

As indicated above, we will try using a Template. I have chosen a letter Template that makes it easy to set up a nice letter.

1. Click on the Office Button in the upper left corner of the screen.
2. Click on New.
3. In the left side, select Installed Templates.
4. Select the Template Urban Letter.
5. Double-click on the template or Click on the Create button.

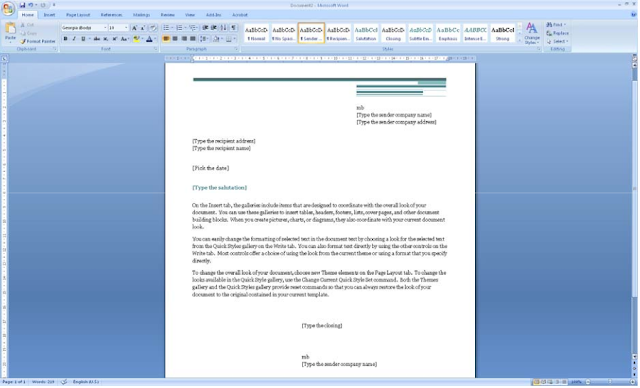
This opens a new mail document. Everything is set up, you just have to type your text into the different text fields. 

Figure 11: New Document from a Template

Using Templates is an excellent way to create documents. If you are working with Word in a company, the company might have created its own templates for letters, faxes, reports and notes, which are adapted to their letterhead, colour, etc. You could ask the IT department in your company if this is the case. 


2. Creating a New Document

When Word starts up, the program will display a new blank document - that is, a completely blank piece of paper which you can begin to write on. That is fine most of the time, but you do not have to start from a completely blank page. Word can help you lay out your documents neatly, so it is easy, for example, to design a nice letter. This is done through a variety of built-in Templates that were installed with the program. You can download even more Templates from the Internet.

If this is not enough for you, you can also create your own Templates once you are familiar with the program.

2.1 Starting on a New Blank Document

You do not have to confine yourself to working in one document at a time. You can have as many documents open as your computer's memory allows. In most cases, this means more than you will ever need.
Let us try to start a couple of new documents, so you can get an idea of your options.

1. Click on the Office Button in the top left corner of the screen.

2. Click on New. (the exercise continues)

You now have the opportunity to choose which Template you want to use. The Templates are organised in
categories on the left side, which you can click on. The categories are divided into two groups. The group with already installed Templates is located at the top, and just below that is the group "Microsoft Office Online." To use the Templates in the last group requires Internet access, since there are a lot of Templates in this group, which would take up quite a lot of space on your hard drive.

Using Templates from Microsoft Office Online is completely transparent. If your Internet connection is open, the overview is loaded automatically, and they are ready to use. You do not have to enter a site and download Templates from there. Everything has been served on a silver platter for you.

Later in the book, when you have to perform a drill, and I ask that you start with a blank document, you must select the category Blank and Recent, then the Template Blank Document. 

Figure 9: Starting a New Document. There are lots of possibilities. 
Start a New Blank Document (exercise continued):

3. Select the group Blank and Recent and highlight the Template Blank Document.

4. Create a new document either by double-clicking the Template or by clicking the Create button, bottom
right.

You have now created an additional document, so you now have two documents. You can switch between them via the Windows Taskbar at the bottom, where there will be a button for each document.  
Figure 10: The Taskbar with the two documents 

Both documents are quite boring and completely blank since you have not written anything yet. But before you start writing, I want you to try one of the many Templates. 


1.4 The Status Bar

The Status Bar, in the bottom left of the screen, shows at all times which page you are on, how many pages there are in total, and how many words there are in the document. There is also a small icon that moves as you type. It shows the Spelling and Grammar Check is active. It also says what language you are using (in case you are in doubt). Joking aside, when, for instance, it says "English", it means that Word understands what you have written to be English and applies the English Dictionary and Grammar Check on it.  
Figure 8: Status Bar
If you start writing in another language, Word will understand after a few words that you are no longer writing in English. It is very handy that you can have text in multiple languages in the same document without the Spell Check getting messed up. 

1.3.6 Zoom

The Zoom feature is easy to use, but in my opinion it is better to hold down the CTRL key on your keyboard while scrolling up and down with the scroll wheel on your mouse. Of course this requires that you have a mouse with a scroll wheel. 

1.3.5 Draft

Draft View is suitable for writing. If there are pictures and graphics in the document, they are not displayed, which means that this View does not require much of the computer. If your computer is a little weak and you need to read a large document, this may be an option. Otherwise I do not think you need to use this View.  

1.3.4 Outline

This view differs somewhat from the others. To make use of it requires that you use Heading Styles. Outline View can display different levels of headers in your document, and it makes it easy to move around between entire sections and change the heading levels. If you are writing long reports or manuscripts, Outline View is a great tool when you need to organise your document, but it is not suitable for reading or writing. 

1.3.3 Web Layout

This View shows how your document would look if you saved it as a Web page. Word can save documents in HTML format, so you can actually create simple Web pages in the program. However, I would recommend that you use a real Web site program for this purpose 

1.3.2 Full Screen Reading

Full Screen Reading is reminiscent of the Print Layout, but Ribbons and various buttons are hidden, so the screen space is used to display the document. This is a good View when you need to read a document on the screen.  

1.3.1 Print Layout

Print Layout is the default View. In this View, what you see on the screen is similar to the print-out. This View is good when you type text, and it is excellent when you want to position pictures and graphics as well as when you need to adjust page setup and margins. This View is probably the one you will use most often. 

1.3 The View Buttons

With the View Buttons you can change the way your document is displayed. The View does not change the way your document appears when you print it. The different Views each have
their advantages depending on what you are working on. 
Figure 7: View Buttons
 

1.2 Quick Access

The small, discrete ”Quick Access” Toolbar is located just to the right of the Office Button. Using Quick Access, you can save, undo, etc. with a single click. "Quick Access" can be customised so you can choose the features that suit you. To do this, right-click on any button and choose Customize Quick Access Toolbar. Alternatively you can click the small arrow to the right of the Toolbar to enable you to quickly select and deselect features. 
Figure 6: ”Quick Acces” Toolbar

1.1 The Office Button

In the upper left corner of the screen, you will find the round Office Button. It corresponds basically to the old "Files" menu. 
Figure 4: The Office Button

When you click on the Office Button, a menu pops up. It is this menu you must enter when you want to create a new blank document, and when you need to save it. You will also find menu items for Preview and Print. 


Figure 5: When you click on the Office Button, this menu opens. 
It is also via the Office Button you get to Word Options, where you can configure a wide range of basic Options that determine how Word functions. If you are not very familiar with Word, you should stay far away from Options at this point. 

1. The Screen and its Elements

In this section, we review the basic structure of Word 2007. You start the program by clicking the Windows Start Button at the bottom left, then click Programs. In the Programs menu there is a folder called Microsoft Office, and this is of course where you find Word.
When you start Word, you automatically start in a new blank document. 
Figure 3: Word and its Screen Elements.

On its surface Word 2007 is a very simple and attractive program, and it is undoubtedly relatively easy to use, but there are some elements you need to familiarise yourself with.


Shortcut Keys

If you like using Shortcut Keys instead of the mouse, you need to know that they work a bit differently in Office 2007 compared to previous versions. I recommend using Shortcut Keys as they are often easier to use than the mouse. Shortcut Keys are
combinations of keyboard keystrokes that give you access to most of the functions you would otherwise select using the mouse.

I highly recommend that you practice using Shortcuts for the functions you use most often, especially if you type using the ten-finger system. Firstly, you can work much faster, and secondly, you reduce the risk of getting a "mouse arm" because you can maintain a good working position.

By simply pressing the ALT key on your keyboard some small boxes with numbers or letters will be displayed above the Quick Access Toolbar Office Button and the individual Tabs in the Ribbon. The numbers and letters that appear correspond to the key you should press to select the function. For this you no longer need to press the ALT key simultaneously. For example, if you press "N", the Insert Tab is displayed, and the features in this Tab will be automatically highlighted with shortcuts. All you need to do is press what is in the small boxes without pressing the ALT key. 
Figure 2: Viewing Shortcuts. 
Some Shortcuts contain more characters to be pressed on the keyboard. For example, the function Increase Indent, which uses the Shortcut "AY". Here you just press A and Y in rapid succession. To arrange everything this way makes sense for someone who uses the ten-finger system. Once you have incorporated the new Shortcuts, you can work even more comfortably with the Shortcut Keys, since you do not have to twist your hands to reach the CTRL key or the ALT key in addition to another key.

Thankfully, the old shortcuts appear to be working still, so if you have very stubborn habits concerning functions such as Cut, Copy and Paste, you can still use the shortcuts you have always used. Personally, I have not had any problems yet. 

Where do I Find the Old Buttons?

If you have used Word for some time and just recently changed to the 2007 version, you are probably going to have some initial problems locating the functions you are used to. This is primarily because many functions have been redesigned in connection with implementation of the “Ribbon”. In some cases the functions have also changed name. I am going to list the most important functions, so you can get used to the new interface as quickly as possible.

New, Open, Save and Save As are located in the Office button. The quick Save function can also be found in the ”Quick Access” toolbar, next to the Office button. Cut, Copy, Paste and Paste Special are located leftmost on the Home Tab in the Ribbon. If you click at the bottom of the large Paste button, it is the same as Paste Special.

Preview and Print are located in the Office button as sub-points to the Print menu point. I recommend that you put them in the Quick Access toolbar, so they are easier to access.
Styles is located in the Home Tab in the Ribbon. You can modify the individual styles by right-clicking on the buttons and choose the menu item Edit.

There is no longer a field in the Ribbon where you can just type the name of the Style, if it is not already on the list. To find the Styles that Microsoft did not think were important, click on what I call "The Secret Button" (see Figure 1). I call it ”The Secret Button” because it took me three cups of coffee to find the ”Heading 3” Style. The Secret Button opens a list of many Styles, but if you want to see ALL the pre-designed Styles, including “Heading 3”, click Settings and select All in the Select Styles box shown. That enables you to use any Style.
Figure 1
To access Columns, select the Page Setup Tab in the Ribbon, then click on the Columns button. There are some pre-designed configurations to choose from, but if you want to control everything, you can click Custom Columns at the bottom of the menu that appears. Now you are inside the window that previously controlled everything about page setup.

New Features in Word 2007

In many of the previous versions of Word, the changes have mostly been cosmetic. In version 2007, Word is still essentially the same program, but on the surface there have been some significant changes that in many cases have made it easier to use.
Ribbons and Tabs

Like the other programs in the Office package, Word has gotten a new, smarter look. The most obvious change is that the traditional Menu and Toolbars have been replaced by the new Ribbon. The Ribbon contains Ribbon. Tabs and every Tab contains buttons for the various functions that used to be located in the Menu and Toolbars. The Ribbon is far more visual and task-oriented; it constantly adapts to your current activity.

If you are used to working with Menus and Toolbars, the Ribbon will take some getting used to, but once that has happened you will start appreciating it. Previously, many functions required that you click your way deep into menus and dialog boxes. In the Ribbon, many settings and functions have been pulled out, so they are more accessible. However, there are also a few unfortunate examples of functions that have become more difficult to use. Especially when it comes to Styles, the Ribbon should probably have been revised before publication.
But the Ribbon is still new and the idea is good. Nobody can get everything right first time, not even Microsoft, so maybe the flaws will be fixed in time for the next version. 

A small Reader Guide

A small Reader Guide
If you have not worked with Word before, I recommend that you read this book from cover to cover and use it for reference later. I have tried to arrange it in a logical manner, so that it is quick and easy to find the chapter you need to solve a particular problem. If you already have some experience with Word, you will probably want to skip some of the first sections to start learning about the advanced functions right away. The book incorporates a series of step-by-step exercises to illustrate Word’s capabilities. You could just read through them, but I recommend that you sit down by your PC and perform them as described. You learn more efficiently that way, and it also gives you an opportunity to go beyond the exercise and experiment a little. I have chosen to keep the exercises very simple and with only a little text. This might make some of them seem a trivial, but the aim is to make sure you understand the simple things that can be easily explained, so you can use the functionality for more complex tasks. I have therefore tried to ensure that you do not have to attempt anything that is out of your depth. There is nothing worse than having to give up on completing an exercise because you get stuck. If you should get stuck anyway, I recommend that you call a good friend or a clever nephew. There is always someone around who has experience with Word and might be able to get you started again.

When I ask you to ”click” on something, I mean a click using the left button on the mouse. A double-click is two clicks in rapid succession with the left mouse button. If I want you to use the right hand button on the mouse, I call it a ”right-click”. Buttons and menus that you can/must click are always underlined. That means that when you see underlined words you should be able to find something similar on the screen to click on.
Now we should be ready to start the program and have a look at it!  

What can you learn?آپ کیا سیکھ سکتے ہیں؟

This book focuses on how best to solve various problems in Word. Rather than a point for point examination of all the functions in Word, it is based on typical tasks and problems you might need to solve. First you will learn how to navigate in the program and tackle basic tasks, such as writing letters and reports, and creating a nice layout. At the more advanced stages, you will learn how to mail merge (combine a Word document with a spreadsheet) and use the proofing tools. Finally, we are going to take a look at the many exciting possibilities to add different kinds of pictures and graphics, and how to quickly and smoothly place your pictures where you want them. When you have read this book and performed the various exercises, you will be a capable Word user. You will be well equipped to deal with all everyday tasks, and to explore the program further on your own.

یہ کتاب ورڈ میں مختلف مسائل کو حل کرنے کے لئے کس طرح سب سے بہترین پر توجہ مرکوز ہے . بلکہ کلام میں تمام افعال کے نقطہ امتحان کے لئے ایک پوائنٹ سے ، یہ عام کاموں اور مسائل کو حل کرنے کی ضرورت ہو سکتی پر مبنی ہے . سب سے پہلے آپ کے پروگرام میں تشریف لے کرنے کے لئے کس طرح اور اس طرح کے خط لکھنے اور رپورٹس بنیادی کاموں ، نمٹنے ، اور سیکھ جائے گی ایک اچھا ترتیب پیدا . زیادہ اعلی درجے کے مراحل میں ، آپ کو ضم میل کرنے کا طریقہ سیکھنے ( ایک سپریڈ شیٹ کے ساتھ ایک لفظ دستاویز یکجا ) اور پروفنگ کے اوزار کا استعمال کریں گے . آخر میں، ہم تیزی سے اور آسانی سے آپ کو ان کے چاہتے ہیں، جہاں آپ کی تصاویر جگہ پر تصاویر اور گرافکس ، اور کس طرح کے مختلف قسم کے شامل کرنے کے لئے بہت دلچسپ امکانات پر ایک نظر لینے کے لئے جا رہے ہیں . آپ اس کتاب کو پڑھ اور مختلف مشقیں کارکردگی کا مظاہرہ کیا ہے، آپ ایک قابل کلام صارف ہو جائے گا . تم اچھی طرح سے تمام روزمرہ کے کاموں سے نمٹنے کے لئے ، اور اپنے آپ کو مزید پروگرام دریافت کرنے لیس کیا جائے گا .

Microsoft Word 2007 Full Book

Microsoft Word 2007 Introduction
Word 2007 is like a typewriter on steroids! In this respect Word is no different from other word processing programs. Since the computer has become a common household and workplace item the typewriter has almost disappeared. Some people might have kept their typewriter, but that is mostly for sentimental reasons. Nowadays a typewriter is only used when a carbon copy is needed. If you do not need carbon copies, and if you have a personal computer (PC), you might just as well donate the old “chopping board” to a museum. Compared to the rest of the Office package, Word has in many versions been the most “over-developed” program. Word can do everything you want when it comes to word processing; probably more than you or I will ever need.This is one reason why there have been very few new features in the latest versions of the program. It has mostly been cosmetic changes to the interface and small improvements of the Spell and Grammar Check. Word has not changed much in Version 2007 either. It is mostly the same both with respect to its strengths and weaknesses. There are some handy Templates for easy letter writing, and it is also easy to create some impressive graphics to support the text, but it is more difficult to place and text wrapping of pictures, and it can be quite a challenge to place captions. This has always been one of Word’s weaknesses and it is somewhat disappointing that nothing has been done to improve it.
ورڈ 2007 سٹیرائڈز پر ایک ٹائپ رائٹر کی طرح ہے! اس سلسلے میں کلام دوسرے لفظ پروسیسنگ کے پروگراموں سے مختلف نہیں ہے . کمپیوٹر ایک عام گھریلو اور جائے کار کی شے بن گیا ہے کے بعد سے ٹائپ رائٹر تقریبا غائب ہو گیا ہے . کچھ لوگوں کو ان ٹائپ رائٹر رکھا ہے ہو سکتا ہے ، لیکن اس سے جذباتی وجوہات کی بنا پر زیادہ تر ہے . آج کل ایک ٹائپ رائٹر صرف ایک کاربن کاپی کی ضرورت ہے جب استعمال کیا جاتا ہے . آپ کاربن کاپیاں کی ضرورت نہیں ہے تو ، اور آپ کو ایک ذاتی کمپیوٹر (PC) ہے تو ، آپ کو صرف اس کے ساتھ ساتھ ایک میوزیم پرانے " کاٹ بورڈ " عطیہ سکتا . آفس پیکج کے باقی کے مقابلے میں، کلام کئی ورژن میں سب سے زیادہ "سے زیادہ ترقی یافتہ " پروگرام کیا گیا ہے . یہ لفظ پروسیسنگ کے لئے آتا ہے لفظ کو آپ چاہتے ہیں سب کچھ کر سکتا ہے؛ شاید آپ کو یا مجھے کبھی ضرورت پڑے گی کے مقابلے میں زیادہ .یہ پروگرام کا تازہ ترین ورژن میں بہت کم نئی خصوصیات کی جا چکی ہے ایک وجہ ہے . یہ زیادہ تر انٹرفیس اور ہجوں اور گرامر چیک کے چھوٹے بہتری کے لیے کاسمیٹک تبدیلیوں رہا ہے . کلام نہیں ہے۔ورژن 2007 میں زیادہ یا تو تبدیل کر دیا گیا . یہ زیادہ تر اپنی طاقت اور کمزوریوں کے سلسلے میں دونوں ایک ہی ہے . کے لئے آسان خط تحریری طور پر کچھ ہاتھ کے سانچوں ہیں ، اور یہ بھی متن کی حمایت کرنے کے کچھ شاندار گرافکس بنانے کے لئے آسان ہے ، لیکن یہ جگہ اور تصاویر سے متن کی ریپنگ کے لئے زیادہ مشکل ہے، اور اس کے کیپشن کو رکھنے کے لئے کافی ایک چیلنج ہو سکتی ہے . یہ ہمیشہ کے کلام کی کمزوریوں سے ایک رہا ہے اور یہ کسی حد تک مایوس کن ہے کہ کچھ بھی اس کو بہتر بنانے کے لئے کیا گیا ہے ہے .
By virtue of its many possibilities, Word is a fairly complicated program, although it is relatively easy to work with. If you have never worked with Word before, you will probably soon find yourself in the wilderness of possibilities the program offers. In his book I will attempt to guide you through that wilderness, so you can learn the things that are necessary for you to use the program effectively. Word 2007 is like a typewriter on steroids! In this respect Word is no different from other word processing programs. Since the computer has become a common household and workplace item the typewriter has almost disappeared. Some people might have kept their typewriter, but that is mostly for sentimental reasons. Nowadays a typewriter is only used when a carbon copy is needed. If you do not need carbon copies, and if you have a personal computer (PC), you might just as well donate the old “chopping board” to a museum. Compared to the rest of the Office package, Word has in many versions been the most “over-developed” program. Word can do everything you want when it comes to word processing probably more than you or I will ever need. This is one reason why there have been very few new features in the latest versions of the program. It has mostly been cosmetic changes to the interface and small improvements of the Spell and Grammar Check. Word has not changed much in Version 2007 either. It is mostly the same both with respect to its strengths and weaknesses. There are some handy Templates for easy letter writing, and it is also easy to create some impressive graphics to support the text, but it is more difficult to place and text wrapping of pictures, and it can be quite a challenge to place captions. This has always been one of Word’s weaknesses and it is somewhat disappointing that nothing has been done to improve it. By virtue of its many possibilities, Word is a fairly complicated program, although it is relatively easy to work with. If you have never worked with Word before, you will probably soon find yourself in the wilderness of possibilities the program offers. In his book I will attempt to guide you through that wilderness, so you can learn the things that are necessary for you to use the program effectively.

اس کے بہت سے امکانات کی وجہ سے، کلام اس کے ساتھ کام کرنے کے لئے نسبتا آسان ہے، اگرچہ، ایک کافی پیچیدہ پروگرام ہے. تم سے پہلے کلام کے ساتھ کام کیا کبھی نہیں کیا ہے، تو آپ شاید جلد ہی کے ریگستان میں مل جائے گا۔ امکانات پروگرام پیش کرتا ہے. اپنی کتاب میں میں نے وہ ریگستان کے ذریعے آپ کی رہنمائی کے لئے کوشش کریں گے، تو آپ کو مؤثر طریقے سے پروگرام کو استعمال کرنے کے لئے آپ ضروری ہے کہ چیزیں سیکھ سکتے ہیں. ورڈ 2007 سٹیرائڈز پر ایک ٹائپ رائٹر کی طرح ہے! اس سلسلے میں کلام دوسرے لفظ پروسیسنگ کے پروگراموں سے مختلف نہیں ہے. کمپیوٹر ایک عام گھریلو اور جائے کار کی شے بن گیا ہے کے بعد سے ٹائپ رائٹر تقریبا غائب ہے. کچھ لوگوں کو ان ٹائپ رائٹر رکھا ہے ہو سکتا ہے، لیکن اس سے جذباتی وجوہات کی بنا پر زیادہ تر ہے. آج کل ایک ٹائپ رائٹر صرف ایک کاربن کاپی کی ضرورت ہے جب استعمال کیا جاتا ہے. آپ کاربن کاپیاں کی ضرورت نہیں ہے تو، اور آپ کو ایک ذاتی کمپیوٹر (PC) ہے تو، آپ کو صرف اس کے ساتھ ساتھ ایک میوزیم پرانے "کاٹ بورڈ" عطیہ سکتا. آفس پیکج کے باقی کے مقابلے میں، کلام کئی ورژن میں سب سے زیادہ "سے زیادہ ترقی یافتہ" پروگرام کیا گیا ہے. یہ آپ کو یا مجھے کبھی ضرورت پڑے گی کے مقابلے میں شاید زیادہ ورڈ پروسیسنگ کے لئے آتا ہے لفظ کو آپ چاہتے ہیں سب کچھ کر سکتے. یہ پروگرام کا تازہ ترین ورژن میں بہت کم نئی خصوصیات کی جا چکی ہے ایک وجہ ہے. یہ زیادہ تر انٹرفیس اور ہجوں اور گرامر چیک کے چھوٹے بہتری کے لیے کاسمیٹک تبدیلیوں رہا ہے. کلام یا تو ورژن 2007 میں زیادہ تبدیلی نہیں آئی. یہ زیادہ تر اپنی طاقت اور کمزوریوں کے سلسلے میں دونوں ایک ہی ہے. کے لئے آسان خط تحریری طور پر کچھ ہاتھ کے سانچوں ہیں، اور یہ بھی متن کی حمایت کرنے کے کچھ شاندار گرافکس بنانے کے لئے آسان ہے، لیکن یہ جگہ اور تصاویر سے متن کی ریپنگ کے لئے زیادہ مشکل ہے، اور اس کے کیپشن کو رکھنے کے لئے کافی ایک چیلنج ہو سکتی ہے. یہ ہمیشہ کے کلام کی کمزوریوں سے ایک رہا ہے اور یہ کسی حد تک مایوس کن ہے کہ کچھ بھی اس کو بہتر بنانے کے لئے کیا گیا ہے ہے. اس کے بہت سے امکانات کی وجہ سے، کلام اس کے ساتھ کام کرنے کے لئے نسبتا آسان ہے، اگرچہ، ایک کافی پیچیدہ پروگرام ہے. تم سے پہلے کلام کے ساتھ کام کیا کبھی نہیں کیا ہے، تو آپ شاید جلد ہی اپنے آپ امکانات پروگرام پیش کے جنگل میں مل جائے گا. اپنی کتاب میں میں نے وہ ریگستان کے ذریعے آپ کی رہنمائی کے لئے کوشش کریں گے، تو آپ کو مؤثر طریقے سے پروگرام کو استعمال کرنے کے لئے آپ ضروری ہے کہ چیزیں سیکھ سکتے ہیں.