WHAT'S NEW?
Loading...
When I say simple formatting, I mean selection of a piece of text to be rendered in another font, colour,
alignment etc. When it gets more advanced, we will start working with Styles, which gives more options.

1. Select the first line using the mouse.
2. Select the Home Tab in the Ribbon.
The Home Tab contains all the basic functions for formatting text. I am not sure why it is called the Home Tab,
but it probably has to do with it being the one shown first.

3. Click on the Bold Button in the Ribbon. It is the button with a ”B” on it (see Figure 13). 
Figure 13: The Bold Button (the yellow button). 

The first line is now in bold.
4. Select once again the text you have just formatted
5. Click on the Center Button.  
Figure 14: The Center Button 
The first line on the page has now been centered. 
Let us write some text, so we have something to work with. You must type the following text into a blank document. When I write "Press ENTER on the keyboard", you obviously do not write it, but press ENTER (or RETURN key, as some call it).

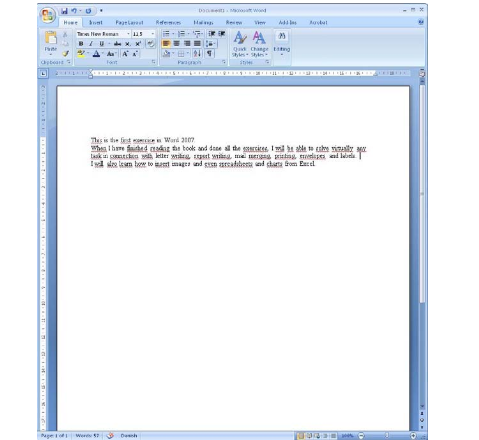
This is the first exercise in Word 2007. Press the ENTER key on the keyboard. When I have finished reading the book and done all the exercises, I will be able to solve virtually any task in connection with letter writing, report writing, mail merging, printing, envelopes and labels. (Press the ENTER
key on the keyboard). 

I will also learn how to insert images and even spreadsheets and charts from Excel. (Press the ENTER key on the keyboard). 
It should look like this: 
Figure 12: Our Text Inside Word.
 

I think you agree that this text looks a little boring. Luckily, there are a lot of things you can do to make it look more attractive, and that is precisely what the next exercises are about. Actually, this small piece of text can teach you a lot about Word’s formatting options, the simple as well as the more advanced ones. 

As indicated above, we will try using a Template. I have chosen a letter Template that makes it easy to set up a nice letter.

1. Click on the Office Button in the upper left corner of the screen.
2. Click on New.
3. In the left side, select Installed Templates.
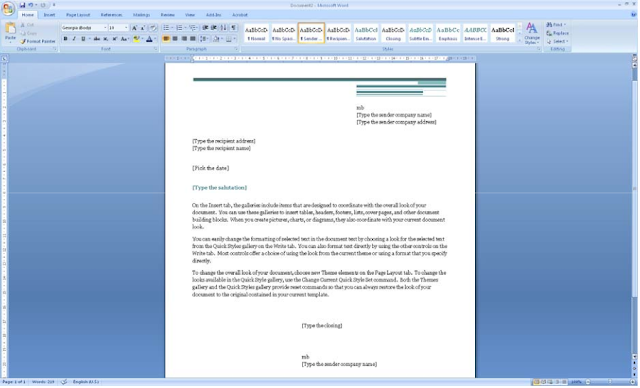
4. Select the Template Urban Letter.
5. Double-click on the template or Click on the Create button.

This opens a new mail document. Everything is set up, you just have to type your text into the different text fields. 

Figure 11: New Document from a Template

Using Templates is an excellent way to create documents. If you are working with Word in a company, the company might have created its own templates for letters, faxes, reports and notes, which are adapted to their letterhead, colour, etc. You could ask the IT department in your company if this is the case. 


When Word starts up, the program will display a new blank document - that is, a completely blank piece of paper which you can begin to write on. That is fine most of the time, but you do not have to start from a completely blank page. Word can help you lay out your documents neatly, so it is easy, for example, to design a nice letter. This is done through a variety of built-in Templates that were installed with the program. You can download even more Templates from the Internet.

If this is not enough for you, you can also create your own Templates once you are familiar with the program.

2.1 Starting on a New Blank Document

You do not have to confine yourself to working in one document at a time. You can have as many documents open as your computer's memory allows. In most cases, this means more than you will ever need.
Let us try to start a couple of new documents, so you can get an idea of your options.

1. Click on the Office Button in the top left corner of the screen.

2. Click on New. (the exercise continues)

You now have the opportunity to choose which Template you want to use. The Templates are organised in
categories on the left side, which you can click on. The categories are divided into two groups. The group with already installed Templates is located at the top, and just below that is the group "Microsoft Office Online." To use the Templates in the last group requires Internet access, since there are a lot of Templates in this group, which would take up quite a lot of space on your hard drive.

Using Templates from Microsoft Office Online is completely transparent. If your Internet connection is open, the overview is loaded automatically, and they are ready to use. You do not have to enter a site and download Templates from there. Everything has been served on a silver platter for you.

Later in the book, when you have to perform a drill, and I ask that you start with a blank document, you must select the category Blank and Recent, then the Template Blank Document. 

Figure 9: Starting a New Document. There are lots of possibilities. 
Start a New Blank Document (exercise continued):

3. Select the group Blank and Recent and highlight the Template Blank Document.

4. Create a new document either by double-clicking the Template or by clicking the Create button, bottom
right.

You have now created an additional document, so you now have two documents. You can switch between them via the Windows Taskbar at the bottom, where there will be a button for each document.  
Figure 10: The Taskbar with the two documents 

Both documents are quite boring and completely blank since you have not written anything yet. But before you start writing, I want you to try one of the many Templates. 


The Status Bar, in the bottom left of the screen, shows at all times which page you are on, how many pages there are in total, and how many words there are in the document. There is also a small icon that moves as you type. It shows the Spelling and Grammar Check is active. It also says what language you are using (in case you are in doubt). Joking aside, when, for instance, it says "English", it means that Word understands what you have written to be English and applies the English Dictionary and Grammar Check on it.  
Figure 8: Status Bar
If you start writing in another language, Word will understand after a few words that you are no longer writing in English. It is very handy that you can have text in multiple languages in the same document without the Spell Check getting messed up. 
The Zoom feature is easy to use, but in my opinion it is better to hold down the CTRL key on your keyboard while scrolling up and down with the scroll wheel on your mouse. Of course this requires that you have a mouse with a scroll wheel. 
Draft View is suitable for writing. If there are pictures and graphics in the document, they are not displayed, which means that this View does not require much of the computer. If your computer is a little weak and you need to read a large document, this may be an option. Otherwise I do not think you need to use this View.